Introduction
So you want to live stream… You heard your friends say if you’re not streaming on Twitch right now you’re missing the boat. You hear about people quitting their day jobs and becoming full-time streamers and you want some of the action.
Clearly there’s a big opportunity here to share content in a new way and build a community around who you are, what you do, and why you do it.
As a game audio school and production studio that’s worked on huge titles including Halo, World of Warcraft, Fable, and Bioshock we’re deep in the gaming world as well as the music production world.
In this post we will break down the entire Twitch streaming model, how to make it work, and how to grow a community around your skills wether that be playing games, live producing, or djing. Let’s get started.
What To Stream
The first thing to decide is WHAT you want to stream. Games, music production, talk shows, etc. Every day people are coming up with new ideas and sharing new types of content, so the sky is the limit and it’s hard to tell what will be the next big thing.
Before you begin this journey we highly advise you to go to Twitch, and start watching and interacting with other creators who are finding success if you haven’t already.
How To Stream
The content of your stream also will denote what kind of hardware you need. For all of these setups, you’ll need a few basic things: a Mac or PC (PC recommended for most functionality), a microphone, a webcam, speakers or headphones, a stable internet connection, and your software of choice either OBS (Open Broadcast Software) or SLOBS (Stream Labs Open Broadcast Software).
Many platforms are now offering multiple streaming services, but thankfully most of them can use the same software. Lets run down which platforms are best for what kind of streams.
Audio
Streaming games is by far the most involved, and streaming the games with quality audio is even moreso. You can use a basic 3.5mm gaming headset like the HyperX or Sennheiser PC series, but the audio quality of those mics are..amature at best. If you really want to get your mic game going, you’ll need a broadcast mic like an SM7B or an RE20. Of course for those you’ll need an interface with some quality preamps, an Apollo Arrow or Apollo Twin are recommended but you can always use a Focusrite 2i2 if you don’t want to break the bank.
If you’re using a broadcast mic, it generally won’t be an issue to use speakers as the polar pattern on the mic doesn’t allow for much feedback, however if you decided to use a condenser mic (for example if there are multiple participants in the room) you’ll need to use headphones so that your signal doesn’t start feeding back on itself. If that’s the case you’ll either want to get an interface with multiple headphone outs, or a headphone amp. You can get inexpensive but quality ones from Rolls.
Note: There is a quirk with OBS and SLOBS where if you have an interface with multiple inputs, it will ONLY allow input from channels 1 and 2, so if you’re trying to stream a set with multiple hardware synths or more than 2 mics you’ll want to get creative with an external mixer.
Video
So there’s your audio, next up is video.
More decisions: are you going to be playing a game and not showing your face? Are you going to be doing a talk show with another person, either in-room or on video chat?
If you’re only going to be capturing your computer screen and audio, you don’t need any extra gear, lucky you! However, if you’re looking to include your face in the stream, you’ll need at least a webcam, but there are a few workarounds to this.
The first: if you already own a normal camera (or camcorder) you can buy a CamLink from Elgato, this converts any normal camera into a webcam via an HDMI to USB dongle. Alternatively, there is an app called EpochCamHD which turns your phone/tablet camera into a webcam via USB or WiFi connection to your computer.
If you’re going to be gaming on a console or capturing any kind of outside video source (camera, console, second computer) you’ll need a capture card (or two, depending on how many things you want to capture).
The most common, widely supported, and easy to use are made by Elgato. They make 2 different types, with a few different models of each.
The first type is an external device that plugs into your computer via USB, has HDMI in for your device, and HDMI out to your monitor/TV. The second kind is a PCIe card that slots into your PC and has HDMI in and out ports with the same functionality as above. Note that with these cards hooked up you won’t be able to output video without your PC being powered on.
If you’re going to be using retro consoles (e.g. anything that uses component or composite outputs) you’ll need either an HDMI adapter, or an upscaler. Adapters can be had for cheap on Amazon, upscalers, less so. I would recommend something like the OSSC or the Retrotink if you’re going for the best possible video quality out of your old consoles. If you want to black out your background, you’ll need to invest in a green screen and some lights, or some specialty software like Logitech’s Chromacam.

OBS Settings
So now for the nitty-gritty. Open Broadcast Software (OBS) and StreamLabs Open Broadcast Software (SLOBS) are infinitely customizable, so no two streamers settings will look alike (unless you’re using templates, however, any in-depth template will cost some cash).
We’ll start with SLOBS as it’s the most accessible and widely used.
Again, your SLOBS settings will depend on your system, and what you want to stream, however, there are a few standards that are unanimous across the board.
In your SLOBS general settings panel you’ll need to make a few basic decisions, like if you want to record your stream, whether to keep recording after stopping your stream. You’ll probably want to turn on “Confirm Stream Title and game before going live” so that you don’t accidentally go live without knowing it, but the rest of the settings in this panel can be left as is.
In your Stream settings panel, you’ll want to login to any accounts you wish to stream to, Twitch, Youtube, FB, etc. That’s about all you’ll want to do in these settings.
Now, in your Output settings panel you’ll want to set your output mode to Advanced. This will open up the other settings in this panel. You’ll want to set your audio track to 1, and if you have an NVIDIA Graphics card (GPU), change your encoder settings to NVENC. NVENC is a specialized core on your NVIDIA card made specifically for this purpose. If you DON’T have an NVIDIA card, leave your encoder setting on Software (x264). This means that your stream encoding is being processed by your computer’s main processor, your CPU.
Twitch Bitrate
Moving on, you’ll want to set your Rate Control to CBR (shorthand for “controlled bitrate), the rule of thumb for this is that you want to keep your bitrate to no more than half of your internet upload speed (more on this in the Internet speed section). So if your upload speed is 2 MBp/s, you want your bitrate to be no more than 1 MBp/s, but this will vary depending on your speed test results. Next, you’ll want to set your Keyframe interval to 2, change your CPU usage preset higher or lower depending on the strength of your CPU, and as for the rest, you can leave those as is.
In your audio settings, you’ll want to set the sample rate to match the sample rate on your interface, and you’ll most likely want to set your channels to mono. You can also change your default audio devices, but that isn’t necessary here.
Twitch Video Settings
For your video settings, you’ll want to set your Base Resolution to 1920×1080, and your output Resolution to 1280×720. The reason being that your internet will have to do less processing the upload while your computer handles the heavy lifting of downscaling your stream resolution. You’ll want your Downscale Filter set to Lanczos, your FPS Type set to Common FPS Values, and your Common FPS values set to 60.
As for the advanced settings, this part isn’t necessary, but if you want your stream to look extra crisp at the expense of more processing power, you can set your process priority to Above Normal, your Color Format to NV12, YUV Color space to 709, and your YUV Color Range to partial. You can also change the file naming convention of your recordings, and your automatic reconnection settings in case your internet gets flustered. I wouldn’t recommend changing any of the settings on that or anything else in this panel, but be sure that the reconnection settings are enabled.
The rest of the settings are entirely optional, but some can be useful if you want more utility. I have my SLOBS set to Dark mode (in the appearance tab), and the remote control tab allows you to use the SLOBS remote app on your phone or tablet to control the stream from said device instead of having to use your computer. You can also set up hotkeys if your keyboard has macro keys, but that’s relatively uncommon, this would be more for use with something like the Elgato Stream dock, which is not necessary, but nice to have if you stream all the time and change between scenes/sources a lot.
Luckily for both of us, the settings for all of these things are the exact same in regular OBS, just with less options and less connectivity with other applications.
Setting Up Scenes in OBS
So now that we’ve gotten this far, let’s start setting up our Scenes and sources in OBS.
Sources are exactly what they sound like, sources of video/audio/other input or output sources, like your Webcam, capture card, PC monitor, audio interface, headset mic and others. For standard setup you’ll want to set up a Video Capture Device, for your camera (be it webcam, Epoc, or Camlink), a second Video Capture Device for your Capture card if you’re using one or a Display Capture to capture your computer monitor if you aren’t. You’ll want an audio input capture for your interface/microphone, and an Audio Output capture for your computer audio output. When creating each one of these sources, you’ll be prompted to select the source for the source (phrasing?). So when you create your audio input capture, you’ll specify in a drop down menu that it will come from your interface, when you create the source for the video capture device, you’ll specify that it’s from your webcam and so on.
Scenes are essentially collections of sources, and there are a few standard sets of Scenes. First would be your webcam only stream, where the only source is your Webcam, and audio input from your interface. You can also include your desktop audio if you want to play music or have a soundboard, but that’s not necessary. Next would be your main stream, including all the sources we stated above, video capture, audio input and output capture, monitor capture, etc. You can also include images that are housed on your computer with the “Image” source so you can include any logos or things like that.
Internet speed for streaming on Twitch
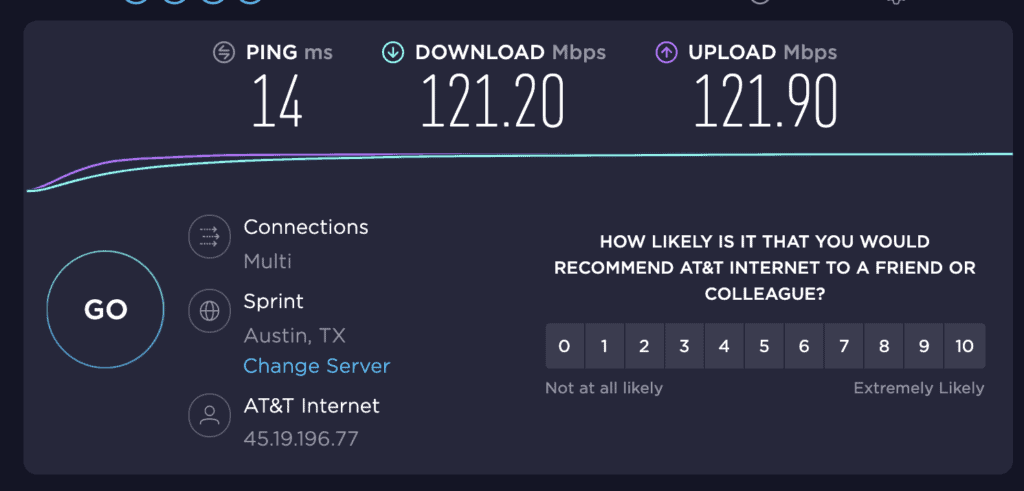
As opposed to normal internet usage, streaming actually works in reverse. When you’re watching Netflix or downloading files, what matters is your down speed. With streaming to Twitch (or anywhere else) what matters is your UPLOAD speed. Usually you want a steady upload speed of at LEAST 8 MBp/s, optimally you would like 10 MBp/s or more, but that can be hard to come by with standard internet connections. You’ll still want good download speeds if you’re going to be using Discord, watching videos, or playing online games for your stream, but that’s pretty standard.
To test your internet speed we like to use speedtest.net. Which will give you a readout that looks like this:
Want to quit
your day job?
Pyramind Music & Audio Production Institute will help you
- consistently release music
- master your craft
- become a professional creative
Our hands-on in-studio training, in San Francisco is designed specifically for emerging artist producers just like you.
Twitch’s affiliate program explained
The Twitch affiliate program is the standard way to earn income streaming on Twitch. To become an affiliate, you have to reach 50 followers, stream for 8 hours, stream of 7 different days, and have an average of 3 viewers on your streams. You have to reach all 4 of these requirements within a 30 day period, so persistence is key. Once you reach these goals, there is a lengthy document full of legalese that you’ll need to read over to sign the agreement. It’s all relatively standard, however, there are a few sticking points which I’ll break down in simpler terms.
First: if you are an affiliate, you are NOT allowed to multistream, meaning you can not stream on Twitch, Youtube, Facebook, etc, at the same time. Any content live streamed on Twitch must remain Twitch exclusive for 24 hours, meaning that if you record your stream, you are not allowed to upload it to YouTube for at least 24 hours.
In section 4.1, Twitch says they may close your inactive account, meaning that if you are inactive for an extended period of time (over a year), your participation in the Affiliate Program will be terminated. This doesn’t mean they will delete your account, they will just cancel your presence in their financial systems. This also means that you will stop receiving 1099s from Twitch.
Finally, the payout: you can only payout from Twitch once you have over $100, and subscriptions/cheers (bits) are all subject to taxes, bank fees, and processing fees, and that’s before the 50/50 payout split with Twitch.


Twitch Dashboard
So once you sign in to Twitch and go to your account menu, you’ll see an option for your Creator Dashboard. You can also just remember the url dashboard.twitch.tv to go straight to it.
Once you’re in here, you’ll see a few different panels. These may be in a different arrangement when you login, but the content is always the same.
You’ll have an activity feed, your stream preview, your quick actions, and your stream chat. There is also a sidebar with a few more options, as well as a ticker at the top of the screen that lists your stats. Your quick actions are also editable, so let’s take a look at those real quick.
- The Edit Stream Info tab allows you to edit what category you are streaming in, as well as the title, and live notifications for your stream. Clip That will save the last few seconds of your stream as a clip to your channel.
- Once you hit Affiliate status, you’ll get the option to run a 60-second ad break. The CPM on these ads is a dollar per 1000 views, so it can take a while, but Twitch won’t let you run too many ads so you can’t spam your channel. You also have different time options for ads, from 30 seconds up to 180 seconds.
- Raid Channel will start a Raid on the channel of your choice. Raiding is essentially gathering everyone who is currently watching your stream, and sending them to another channel; this is usually done at the end of a stream, or by a large channel to a smaller channel.
- Add Stream marker will add a timestamp to your stream, so if someone watches the VOD of your stream, they can jump between timestamps, or you can use them in the Highlighter function, which is essentially a video editor that allows you to grab snippets of your past streams. You also have the option to add a stream marker with a description, essentially the same as the last, but with a text description.
- Host Channel allows you to re-stream someone who is currently streaming on Twitch to your channel, showing them off to your viewers.
- Start a Rerun allows you to re-stream your past streams, essentially working the same as reruns on TV.
- Channel Points Reward Queue allows you to edit the rewards people receive for redeeming channel points. Channel points are a currency specific to your channel that people earn by watching your streams, and can redeem them for rewards of your choosing.
- Start watch party allows you to start a watch party of Prime Videos, shows, and movies with your viewers.
- Clear Chat History does just that, cleans up the chat. Emote only chat switches the chat to emote only mode, no words allowed. You can also limit the chat to follower only, or once you get affiliate status, Subscriber only chat.
Now, on the left hand side of your dashboard is another options menu, in here you can see insights into your channel analytics, your stream summary, which is essentially your analytics for your most recent stream, and your achievements, which are trackers for your growth on Twitch, as well as your path to affiliate status.
Next you’ll see the Community tab, which allows you to manage the Roles on your channel, like mods, or VIPs, or any other roles you want to create, all with different levels of access to your chats utilities, like muting, blocking, or banning people from chat. Those actions will get saved in your Activity timeline.
The Content tab is next, starting with the Video Producer tab, including editing options for your past streams for up to a month after they go live to create highlights, clips, and edit out certain parts of your older streams. Collections are series of your old streams that you can collect together based on their content or other themes, and clips are where the clips you or others create of your streams.
Twitch Settings
On to the good stuff: the settings tab.First will be the stream tab, housing your Stream key (which you want to protect at all times), Disconnect protection, which you for sure want left on at all times. You also want to leave Store Past Broadcasts on, unless you don’t want to keep your past broadcasts for some reason. You can toggle the mature content filter on or off here, which will cause people to have to confirm their age when they open your stream.
You want to leave enable clips on, unless you don’t want people making clips from your video, but you’ll want that so people can find your channel easier and learn more about your streams. You don’t want to turn on followers only mode, unless you’re being trolled or something like that, same with subscriber only mode.
You’ll want to leave on low latency mode so you have better interaction with your audience, unless you’re not looking to interact with your audience, but it’s generally best practice to interact with your audience as much as possible, they’re here to watch you and get to know you, so interacting with them makes them feel welcome and friendly.
You won’t want to change the permissions settings unless you’re part of a team or have a partner stream. You want to leave allow all raids on, as they will always bring more viewers and followers to your stream. Under here are all your channel customization options. Your profile picture, banner, username, bio, profile colors, offline banner, social media links, and schedule, are all in this tab and all customizable to your specifications.
The file and image sizes are all listed here, so you should be able to get that all running pretty smoothly. Your host list is what channels you will host when your channel is offline, so even when you’re not streaming, if someone on your host list is streaming they will appear on your channel. You’ll want to leave all the settings here turned on, as well as the raids and drops settings. Drops are essentially an expanded version of your channel points, but larger rewards provided by Twitch.
Next are the moderation settings, you probably want to leave Level 1 Automoderation on, and set the restrictions to what you’re comfortable with. The Drops are next, and Twitch lists the open drop campaigns that you are able to participate in. The Streaming tools tab is just a place to download the streaming softwares. Extensions are essentially plugins for your stream software, i won’t go over those here cuz there are SO SO many, so you can look through these to your heart’s content and find something specific you’re looking for.
Many of the settings in the dropdown menu on the top right of your main twitch screen are just mirrored settings of the settings we just went over, however, you should check your 2-factor authentication in the Security and Privacy settings, and your Notification settings in general so you don’t get bombarded with emails. You can also change your Twitch URL and Display name here in the profile settings. Also, at the bottom of this drop-down menu, you will see a toggle for dark mode. If you don’t want to roast your corneas, I would recommend turning this on.
How to get viewers on Twitch
The easiest and quickest way to get more followers on Twitch is to stream regularly, often, and for long periods of time. You’ll want to stream for at least 3-4 hours at a time, and set a schedule for certain days of the week. If you’re going to take time off, you should let your audience know as far in advance as possible. You want to be sure to post on your social media accounts a day before, and/or a few hours before you go live.
Conclusion
Clearly Twitch is a highly robust platform with lots to think about, adjust, and tailor to your liking. It can be a little tough for some people to get up and running due to the outside software and somewhat technical know-how needed but this can be an opportunity because there will be fewer people taking the time to figure it out.
At Pyramind we pride ourselves on helping our students excel and grow with the industry, learning new mediums, and developing new channels.
If this type of thing has gotten you excited check out all of our world-class audio production programs here.
Happy Streaming.